Getting Started with Vivify
Bring your map to life.
Note
As a reminder, you MUST add "Vivify" as a requirement to your map to activate Vivify. Additionally, Vivify will only load on v3 maps.
Setting up Unity
First, you should download the Unity Hub. Beat Saber 1.29.1 uses version 2019.4.28f and Beat Saber 1.30.0+ uses 2021.3.16f1. For maximum compatibility, you should use 2019.4.28f found in the archive and use Swifter's VivifyTemplate to setup your project and build your bundles.
Warning
Due to changes in Unity between versions, 2019 bundles will have non-functioning shader keywords in 2021. VivifyTemplate runs an included script by nicoco007 that will automatically fix these keywords whenever you build using it.
Make sure you have Virtual Reality Supported enabled in your project and your stereo rendering mode is set to Single Pass. (Edit > Project Settings > Player > XR Settings > Deprecated Settings > Virtual Reality Supported). VivifyTemplate will do this for you.
Writing VR shaders
Beat Saber v1.29.1 uses Single Pass Stereo rendering (See Single Pass Stereo rendering for more info). Use the unity built-in function UnityStereoTransformScreenSpaceTex to fix your shaders in vr.
sampler2D _MainTex;

fixed4 frag (v2f i) : SV_Target
{
  return tex2D(_MainTex, UnityStereoTransformScreenSpaceTex(i.uv));
}
Beat Saber v1.34.2+ uses Single Pass Instanced rendering. Any incompatible shaders will only appear in the left eye. To make your shader compatible with this vr rendering method, add instancing support to your shader. See Single-pass instanced rendering and custom shaders for how to add instancing support. Look under "Post-Processing shaders" to see how to sample a screen space texture.
Tip
There are many commonly used structs/functions in UnityCG.cginc. As a few examples, appdata_base, appdata_img, appdata_full, and v2f_img can usually be used instead of writing your own structs and since most image effect shaders use the same vertex function, the include file has a vert_img that can be used with #pragma vertex vert_img.
Example
Warning
Beat Saber applies a constant post-processing effect that converts alpha to bloom. If your model appears normal in the editor, but pure glowing white in-game, your shader is likely outputting an alpha of 1. Make sure to use a Beat Saber compatible shader or that your own shader is not outputting an alpha if you do not want it to glow.
See some Beat Saber compatible shaders that comply with the alpha rule on nicoco007's Custom Avatars Unity project.
If necesssary, the bloom effect can be disabled using SetCameraProperty, though this is not recommended because the will break other shaders that may rely on this effect, such as notes, walls, sabers, lighting, and ui.
Tip
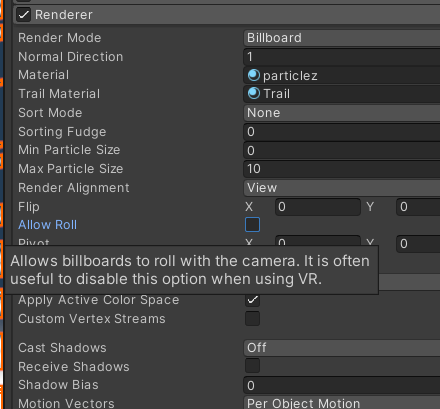
When using billboard particles, it's advised to disable the "Allow Roll" option under the Renderer section of a particle system.
Multipass
On versions past 1.29.1, players may use AssetBundleLoadingTools to instead use Multipass instead of Single Pass Instanced to keep compatibility with outdated shaders. Due to the nature of multipass, this unfortunately introduces a few problems.
- You will have to pay more attention to performance, as multipass is even less performant than 1.29.1's Single Pass Stereo rendering method.
- By default, Unity does not use
unity_StereoEyeIndexwith multipass. Luckily, Vivify sets two shader properties to help with this:- The
MULTIPASS_ENABLEDkeyword will be enabled when a VR camera is rendering. Be mindful of Shader variant stripping possibly stripping this keyword from your shader. - The
_StereoActiveEyeint will be set to either 0 or 1, mirroring whatunity_StereoEyeIndexwould have been.
- The
Example
Example shader that only renders in one eye, or renders half in both eyes.
#pragma vertex vert
#pragma fragment frag
#pragma multi_compile_instancing
#pragma shader_feature_fragment MULTIPASS_ENABLED

#include "UnityCG.cginc"

struct v2f
{
  float4 vertex : SV_POSITION;
  float2 uv : TEXCOORD0;
  float3 localPos : TEXCOORD0;
  UNITY_VERTEX_INPUT_INSTANCE_ID
  UNITY_VERTEX_OUTPUT_STEREO
};

float _StereoEye;

#if defined(MULTIPASS_ENABLED)
float _StereoActiveEye;
#endif

v2f vert(appdata_base v)
{
  UNITY_SETUP_INSTANCE_ID(v);
  UNITY_INITIALIZE_OUTPUT(v2f, v2f o);
  UNITY_INITIALIZE_VERTEX_OUTPUT_STEREO(o);

  o.vertex = UnityObjectToClipPos(v.vertex);
  o.uv = v.texcoord;
  o.localPos = v.vertex.xyz;

  return o;
}

fixed4 frag(v2f i) : SV_Target
{
  #if defined(USING_STEREO_MATRICES)
    UNITY_SETUP_STEREO_EYE_INDEX_POST_VERTEX(i);
    clip(0.9 - abs(_StereoEye - unity_StereoEyeIndex));
  #elif MULTIPASS_ENABLED
    clip(0.9 - abs(_StereoEye - _StereoActiveEye));
  #else
    clip(sign(_StereoEye - 0.5) * i.localPos.x);
  #endif

  return 1;
}
Creating an asset bundle
(Optional) See Unity Asset Bundle Browser tool. This tool allows you to browse the contents of a built asset bundle.
Bundles should be placed in your map folder and called either bundleWindows2019.vivify, bundleWindows2021.vivify. Although Quest support does not exist yet, bundles should still be built for them and be called bundleAndroid2021.vivify.
Map Folder
├── bundleWindows2019.vivify
├── bundleWindows2021.vivify
├── bundleAndroid2021.vivify
├── song.ogg
├── cover.jpg
├── ExpertPlusStandard.dat
└── info.dat
When referencing an asset's file path in an event, remember to write in all lower case. You can use the above Asset Bundle Browser tool to see the path of specific assets.
By default, when Vivify will check against a checksum when loading an asset bundle. This checksum can be found in the file next to wherever you build your bundle in the form of *.manifest (VivifyTemplate will instead write a bundleinfo.json). You can add the checksum to the map by using the "_assetBundle" field in the info.dat.
Tip
This checksum check can be disabled by enabling Debug Mode using the -aerolunaisthebestmodder launch parameter. Remember to make sure your map loads without this parameter.